You hear about Southern Fried Chicken a lot. Many of these are correctly labeled, but with some small variations from the basic dish prepared in the South, especially in the Pee Dee Area of South Carolina. Fried chicken is a favorite dish for us and is pretty easy to prepare.
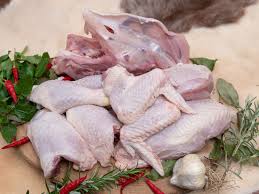
We start with the preparation of the chicken. It is cut into individual pieces, usually about 12 to 15 pieces. This includes legs, thighs, wings, pulley bone, breast, and pieces of the back. Personally, I like to cut the breasts into 3 to 5 pieces to avoid large thick pieces of meat. This is obtained by cutting the whole breast area into three parts by cutting along each side of the main breast bone and then trimming a boneless piece from each of the side pieces. We like to have the flour fried crisp on smaller pieces for a more enjoyable taste. You may have your own method of cutting it up

.
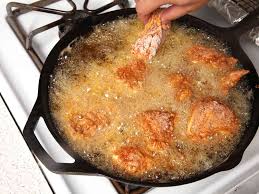
Next, rinse the chicken pieces in a sink of clear water and drain off the water leaving the pieces moist. Let the chicken set to drain while preparing the oil for frying. A medium to large frying pan is needed. Many prefer a cast iron frying pan to provide a better finished taste. Any thick metal pan will be okay. Pour your choice of cooking oil into the frying pan. I usually use a good grade of vegetable oil. Use enough oil so that the pieces will rest half covered in the oil. A little over half way is okay. The type of oil used can affect the taste of the finished product.
While the oil is heating up on medium to medium high temperature on the stove, pour about a cup and a half of self rising flour into a pan, bowl, plate or bag as you choose. The idea is to cover the chicken completely with the flour. Seasoning of the chicken is important and can be accomplished in several ways. I usually add salt and pepper to my taste, to each of the individual pieces and place them on the dish. If using a bag for flouring, you can put the flour in the bag and add the chicken as you season it. Some people just add the seasoning to the flour. When about one-third or one-half of the chicken is in the bag, twist the top of the bag and shake it up to cover the chicken with flour. If using a dish or pan, add flour and place individual pieces in the flour and roll over until completely covered with the flour. I find that using a teaspoon to scoop up the flour and sprinkle over the chicken is easier to make sure the flour is covering the meat. Depending on the size of your pan, determine the amount of pieces needed to fill the pan with the pieces barely touching. The oil needs to be deep enough to allow chicken to be half submerged or just a little over half. The oil is ready for the chicken when a pinch of flour added to oil will begin to fry. With chicken in pan, cover with lid, (optional) for faster cooking. Adjust temperature to allow chicken to have a steady bubbling of the oil but if it seems to pop and crackle, lower the heat.
Allow chicken to cook until the part in the oil begins to get golden brown. Then turn the chicken over and let the other side cook. Keep in mind that the legs and thighs take longer to cook than the white meat. I try to put both legs and both thighs in the pan at the same time to make it easier to cook them. Usually if you stick the biggest part with a fork, it is done if no red fluid comes out. I sometimes take a piece out of the pan and cut it with a knife to see if it is done. With all pieces, you may want to turn them at least one extra time to make sure they are completely cooked. It may take several cooking adventures to get used to knowing when it is done.

When removing the chicken from the pan, hold it up and let all excess oil drip off before placing them on a dish covered with a couple of paper towels. This reduces the oil left on the chicken for better eating.
Continue this cycle until all chicken is cooked. It tastes best if served hot!
If you would like to make gravy with the chicken for rice or potatoes, turn the heat off and pour the oil from the pan into a safe container leaving just a couple of tablespoons of the oil in the pan with the bits of fried flour in the pan. Turn the heat back on and add about three or four tablespoons of self rising flour to the pan. Stir the flour around in the oil until it gets brown. My elders thought to make the best gravy, you would continue cooking the flour to get it as dark as you can avoiding burning it. While doing this add seasoning to taste, usually salt and pepper. When proper browning is achieved, pour one or two cups of water into the pan, being careful because it will steam up and can cause burns. Add the water a little at a time, stirring to mix with flour and oil. Add as much water to the pan to get the thickness you want for the gravy. Continue cooking at a low heat for a few minutes allowing all the flour to cook. It’s then ready to serve!
This is how most of us in this area of the South like to fry our chicken. There are variations you can use depending on your taste such as using egg and milk base to dip chicken in after initial flouring, and then flouring it the second time. This gives a thicker, crispier taste.
You can view this and my other blogs at Dwaynesonlineshop.com and message me with any questions or comments at [email protected]. Hope you enjoy this offering.
